What’s Docker ?
If you’re interested in the devops universe, you’ve probably heard about Docker; It’s probably the most popular free software in these recent years. We will take advantage of this docker tutorial to learn more about this awesome tool.
It automates the deployment of applications and their dependencies in different isolated containers on any Linux server.
It was originally developed by Solomon Hykes as an internal project of DotCloud as an evolution of open-source solutions already existing within the company. Docker was released in open-source the first time on March 13, 2013. In January 2017, there are 1600 contributors on the Github app.
Definition of a container
Docker has the distinction of working with containers. But what does the term mean concretely?
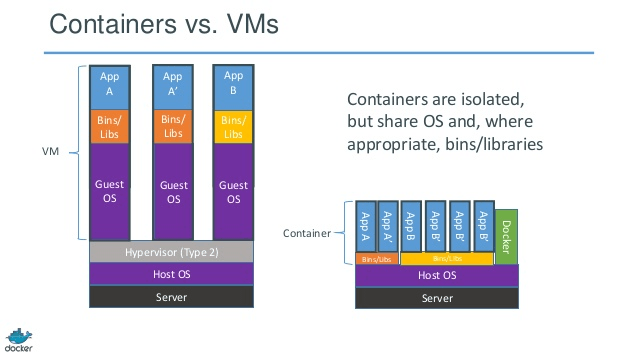
Let’s start with a small diagram:

As this diagram shows, a virtual machine will recreate a full server for each application (reserving resources) with its own operating system. However Docker will isolate the application while using the operating system of its host.
With Docker, we could suddenly have several different containers to manage different applications but all will use the same operating system:
- Apache in web server
- MySQL in database
- Redis in cache server
Unlike virtual machines, Docker shares all the resources (RAM, CPU …) with the operating system of the host. It’s a big advantage.
It is used to make containers on Linux but beta versions exist to do the same thing under Windows. However, we will stay on the Linux side for the moment.
Docker Tutorial – Install Docker
On Ubuntu it is very easy to install Docker.
sudo apt-get install -y docker.io
Do not hesitate to refer to the official documentation to install Docker on another Linux distribution.
On Windows and Mac OS, you will need to install the Docker Toolbox software which will be a special Terminal window. This tool will use a Virtual Box to run the host Linux. [link]
I will let you refer to the official documentation in case of problems of installation and use of Docker Toolbox.
The first functions to know
Let’s start by launching Docker to use it:
/etc/init.d/docker start
If you have the message “Can not connect to the Deamon Docker. Is the Docker Deamon running on this host?” on Ubuntu while the daemon is running, add sudo in front of each Docker command.
If one day you need it, you will see which version of the application is currently installed:
docker version
We start by launching a first Docker that only serves to display “Hello world” to learn the launch command:
docker run hello-world
The first time, Docker warns you that it can not find the docker image of the hello-world name; but as it can find this image, it automatically downloads the image and launches this first container.
A command help you to see all the containers that are running:
docker ps
By adding the option -a, you will also be able to see all containers that have been launched but stopped.
Let’s work with Docker images
A Docker image is a configuration of a container that we can recover or share. Docker offers the Docker Hub website, which is an image sharing service that is heavily inspired by GitHub.
You will be able to recover a lot of images some of which are directly proposed by the publishers to simplify our work.
I start by looking for a PHP image to download it:
docker search php
The first result is perfect for my test, there is a container of the php name available. I decide to download it
docker pull php
If you have followed this tutorial, you normally have 2 images now downloaded: hello-world and php. Let’s check this with the following command that allows me to know the name of all my images:
docker images
For this first part, we will not detail the options of these functions but it will be very interesting to do that following the tutorial.
I will create my first Docker image
This tutorial will not be the last one on this tool but I do not want to finish this tutorial without beginning this interesting subject of Dockerfile. We will create our own image right now.
Put yourself in a new folder and start by creating a Dockerfile file with the following content:
FROM ubuntu:14.04
MAINTAINER Judicael paquet
This file will allow us to build our first image.
I start by defining the Linux on which will be created my image and the author of it (as much as self-promotion).
Now we will build our image:
docker build .
It downloads and then executes the two steps that I have defined in the Dockerfile. Normally the script ends on a Successfully Build XXX.
We will now add the installation of apache 2 by updating the package list and installing the apache2 package. Here is the updated Dockerfile:
FROM ubuntu:14.04
MAINTAINER Judicael paquet

RUN apt-get update && \
    apt-get install -y apache2
The RUN command will allow us to define linux commands when the image is been created and the \ character allows us to write our command on several lines.
Now we will rebuild our image:
docker build .
Without an option, he automatically cached the previous job; it only takes time for the step we just added.
When you start to manipulate your Dockerfile a lot, you will sometimes need to redo your images completely without a cache. You can launch this command for that:
docker build --no-cache .
To give a name to your image, you will need to add the -t option like this:
docker build -t monapache .
This will allow when you list your images to have written “monapache” instead of “<none>” in the REPOSITORY column.
docker run
We will now launch a container with apache2. I took this example precisely because throwing your container in a classic way it will not work. You have to launch Apache at the same time as launching the container with apachetcl and do it in the -D FOREGROUND mode:
docker run -d -p 8000:80 monapache /usr/sbin/apache2ctl -D FOREGROUND
-d: the detached mode does not block your device. As soon as the container is launched, docker gives you the hand
-p: Set the port to call to reach port 80 on the container. This is very convenient because we can have a container per port.
-D FOREGROUND: Start the process in the container and attach the console to the classic input process.
You can now try to put http: // localhost: 8000 in your browser. Indeed, we manage to display the default page of Linux on ubuntu.
You can now check that your container is also well started with docker ps. Moreover, this command returns to you the name of your container that is put by chance when you do not indicate any name during the launch of this one.
docker stop
Now you can stop your container using the following method:
docker stop [nom du conteneur]
Apache is not installed on the host OS but only on the container; so if you stop this container, Apache will be unavailable.
If you want to put a name to your container, you can use the –name option like this:
docker run -d --name monconteneur -p 8000:80 monapache /usr/sbin/apache2ctl -D FOREGROUND
Conclusion docker tutorial
This first Docker tutorial allows you to take your first steps on a really great tool that has become almost indispensable in the world of devops.


6 Trackbacks / Pingbacks