Story mapping, also known as user story mapping, is an excellent practice to gain a comprehensive vision of the project scope. In this article, I will walk you through the process of creating an effective story map.
Additionally, you can watch the ‘La Minute Agile’ video, which provides a visual explanation of how to create a story map:
How to start this story mapping?
To begin, gather the necessary materials such as square Post-it notes and allocate ample wall space (approximately 3 to 4 meters) because the story mapping will be done on this wall.
In cases where you lack a clear vision of the stories to create, consider starting with the creation of personas and their customer journeys. You can find articles on these subjects here:
Well write a persona in agile project
What’s a customer journey
Example of ecommerce website
In this article, I will define a scenario to help you better understand this practice. Imagine that I am the Product Owner of a new company looking to create an e-commerce website for selling cardboard products.
Definition of our personas
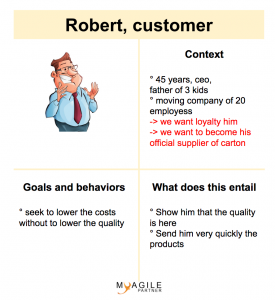
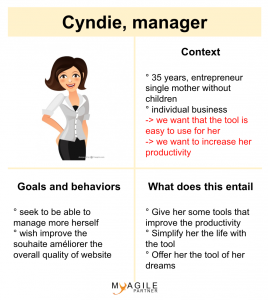
I will simplify our case. We will haveonly two different personas in my application: the customer and the manager.
On a larger ecommerce website, we would have more personas like logistician, merchandiser, administrator…
Here is an example of our simplified persona of customer:
Here is an example of our simplified persona of manager:
Creation of customer journeys
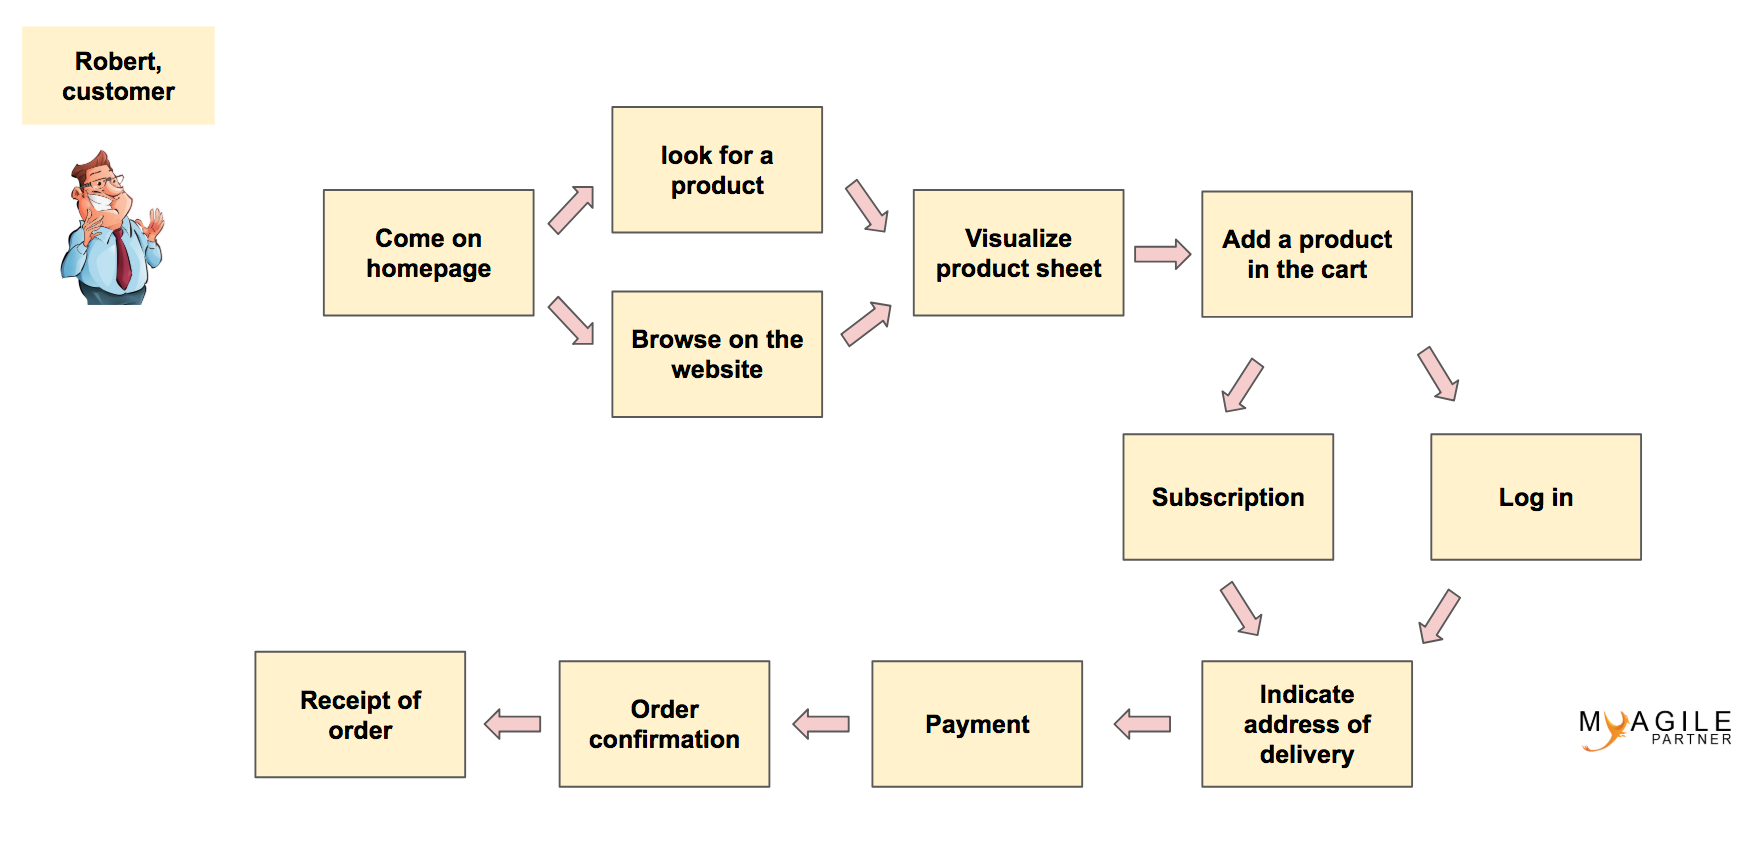
Now that we have defined our personas, it is advisable to do their customer journeys. They will show the typical journey of our two types of key users (describe above).
Here is the typical journey of Robert, our customer:
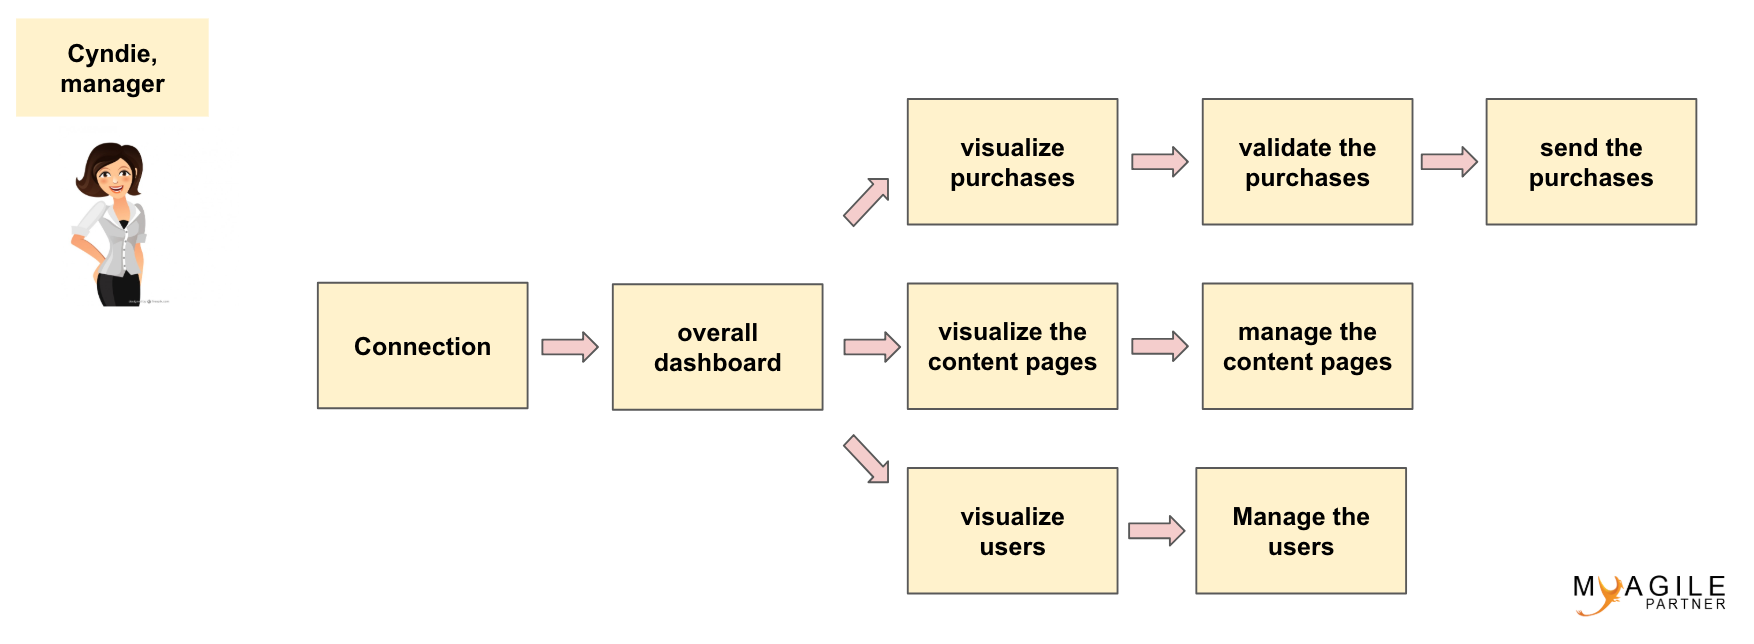
Here is the typical journey of Cyndie, our manager:
I think you have understood the concept; now, we will see the story mapping that is the heart of the subject.
Let’s start our story mapping
Now, we have our customer journeys that will help us to do our story mapping. We will start by defining our general themes. We will define them from our customer journeys:
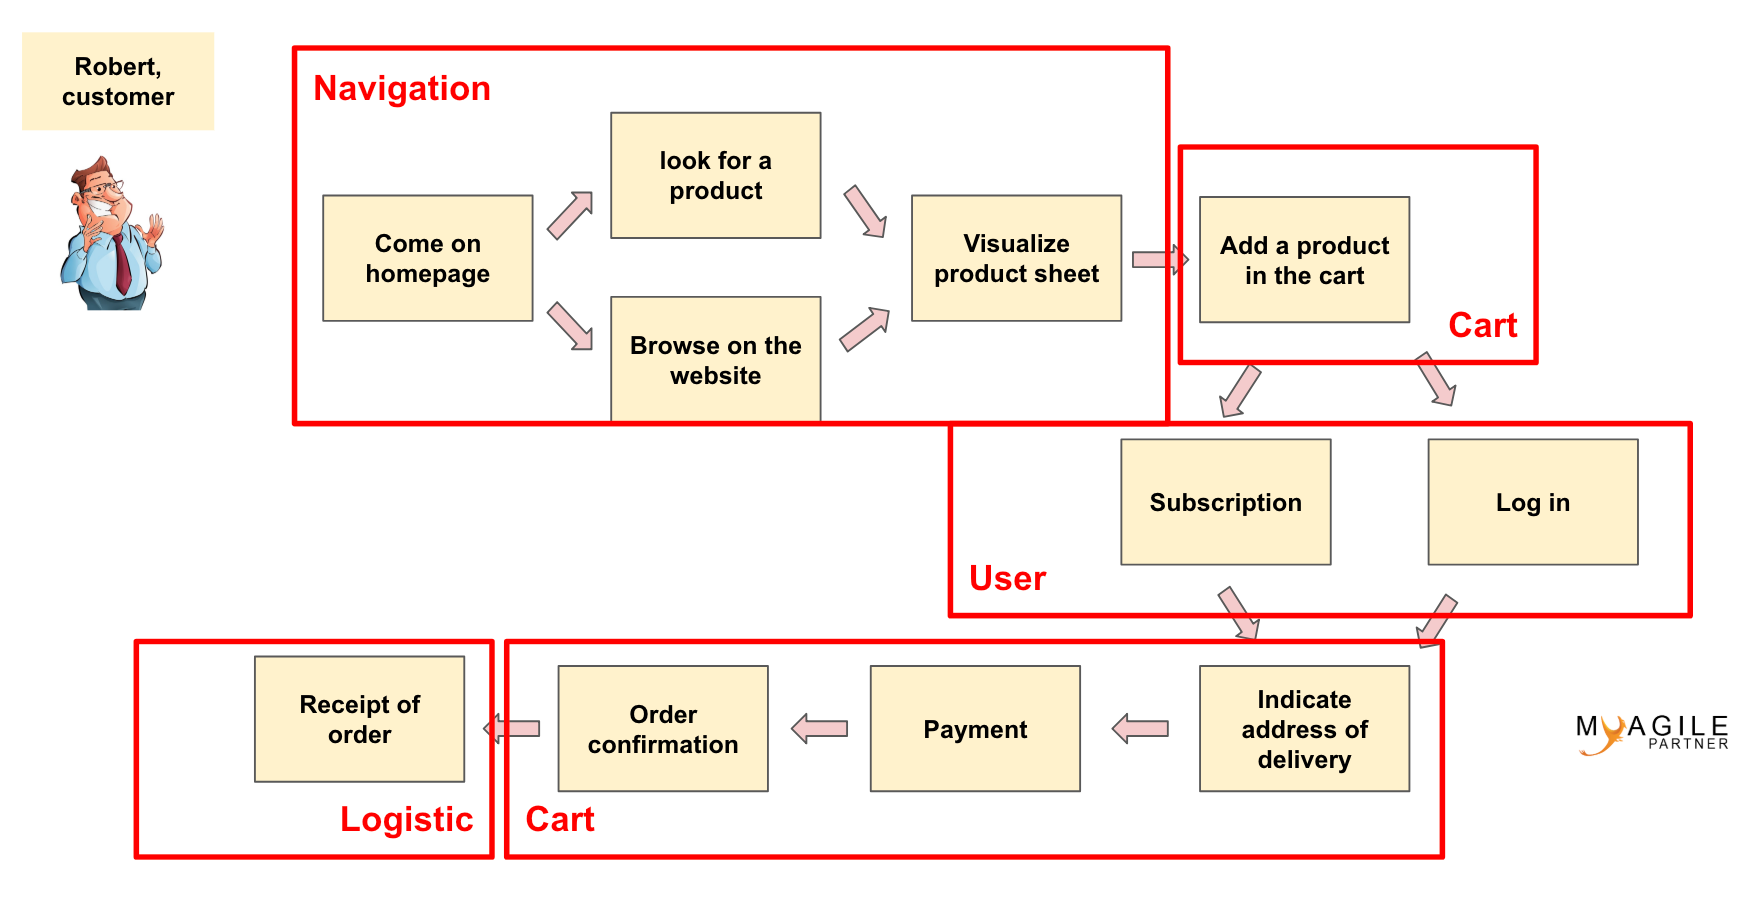
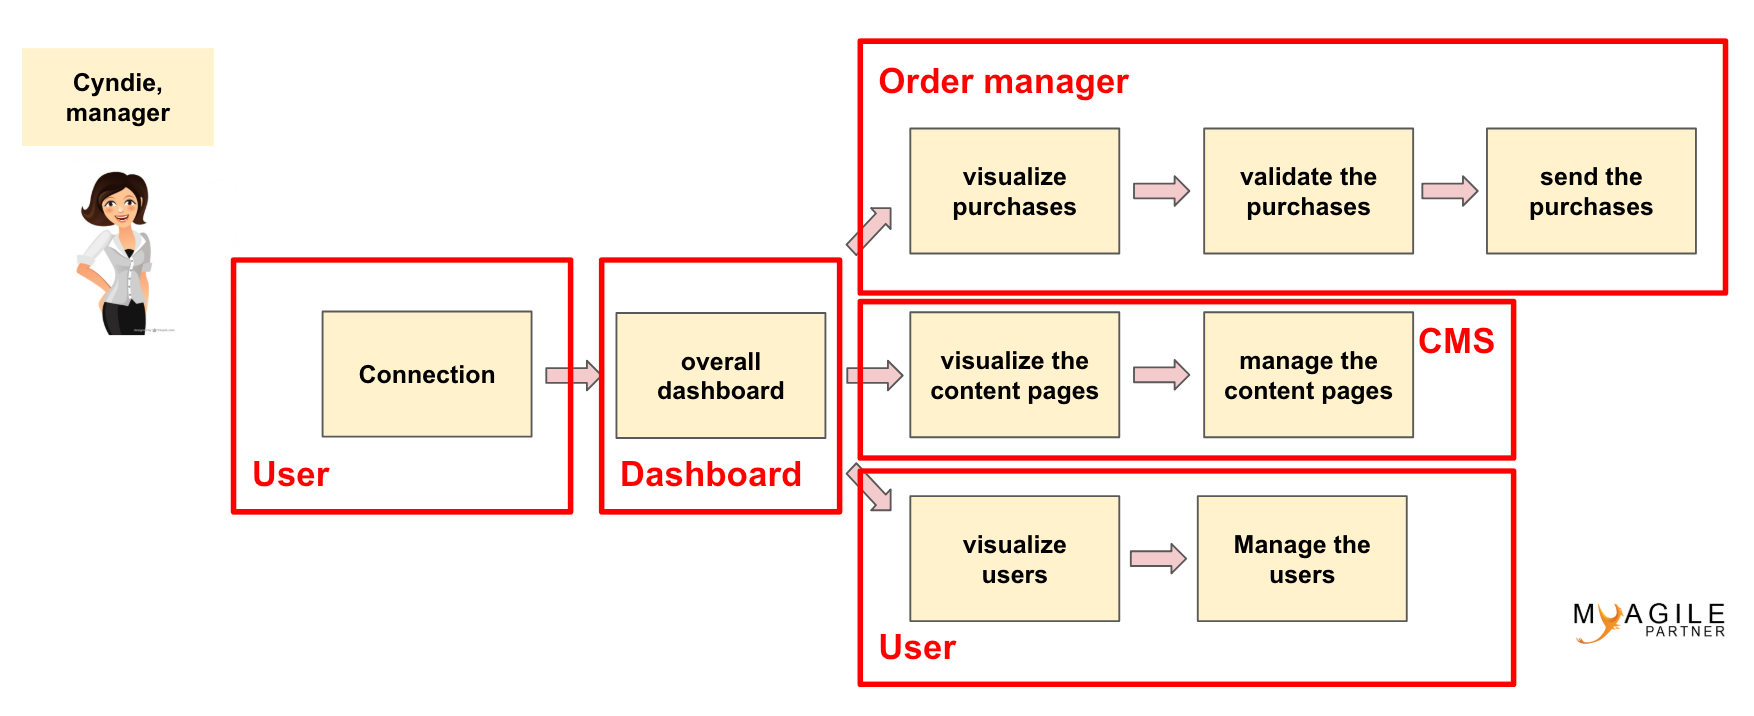
With this theme gathering, we could start the distribution of our themes on our story mapping. There are no specific rules, you can create other themes (front and back for example).
Put the themes in our story mapping
Let’s take the division of themes that we have defined from our customer journeys for our user story map:
Prenons le découpage de thèmes que nous avons définit à partir de nos user-journey pour notre user story map :
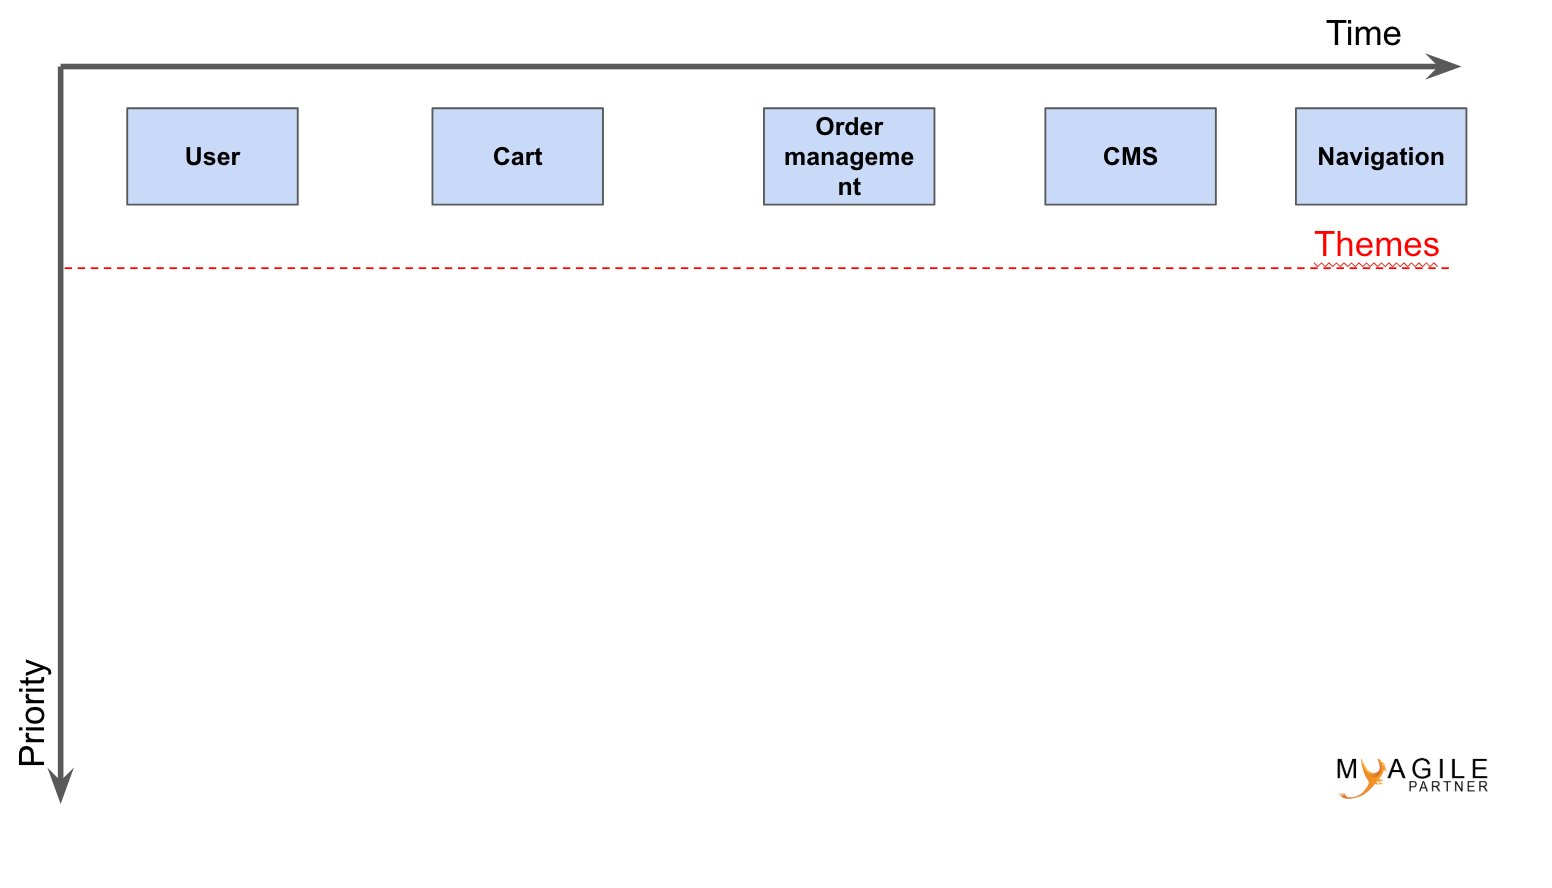
I did not put all our themes but the main idea is to place post’it notes of a specific color for our themes. They are placed in order of development in the time (from left to right).
I stop for a moment on this interesting case. We often start with the user part because we say that it is the basis for starting a project.
In fact, I think that the user part is the last part to be treated for a first production because this part has a little business value. So knowing that the feedbacks will be not essential for the user part, we will focus to develop the parts where the feedbacks will be essential.
We will ask the developers to make an automatic connection as long as the login part of the users is not develop.
Indeed, I will reorganize the order of my themes to get the feedback as soon as possible:
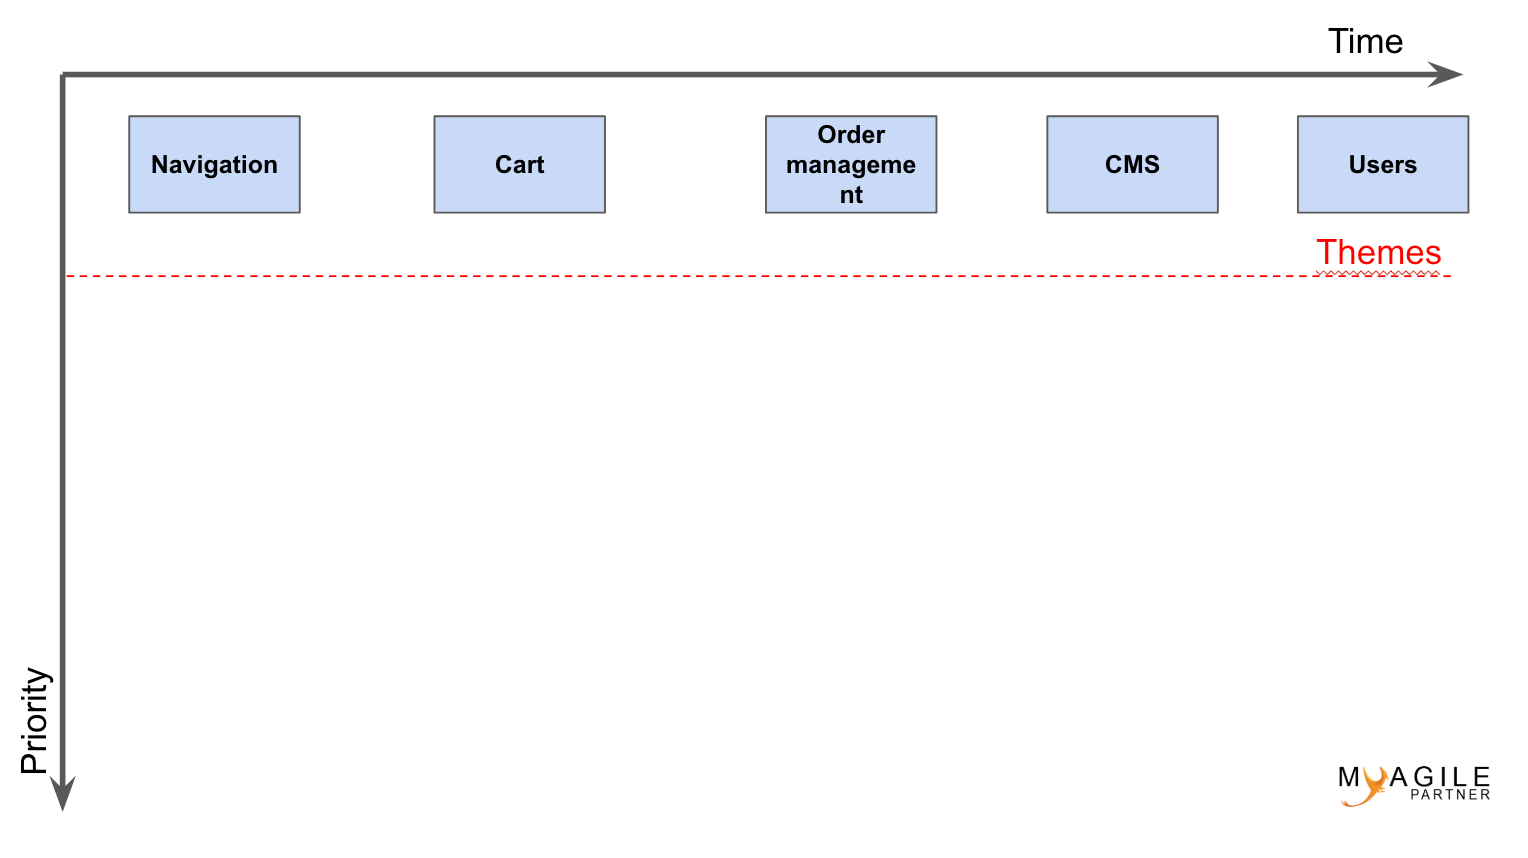
This organization seems not bad but nothing will forbid us to change later if we realize that we can do better. We are agile, we do not hesitate to adapt by thinking that we can do mistakes.
Put the Epics on your story mapping
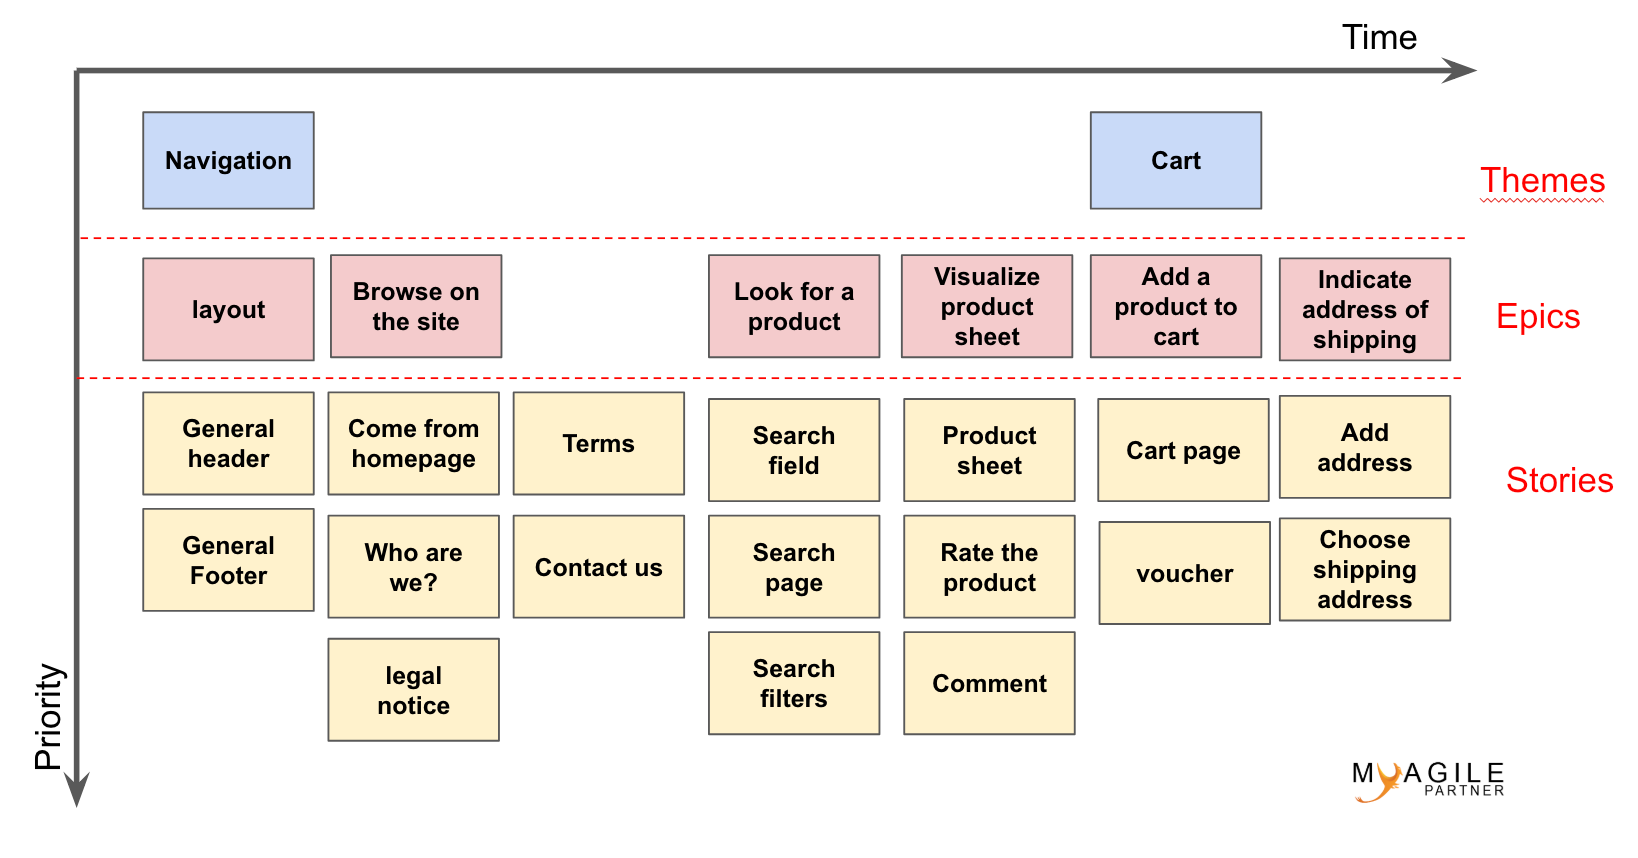
Now, we will put under the themes what we think are our Epics. Epics is a basic feature that may be one or more user-stories when we will do the refinement.
On this step, you are in the process of building of the future backlog. Start from your customer journeys and you will refine afterwards ; no trouble if it’s not perfect for the moment.
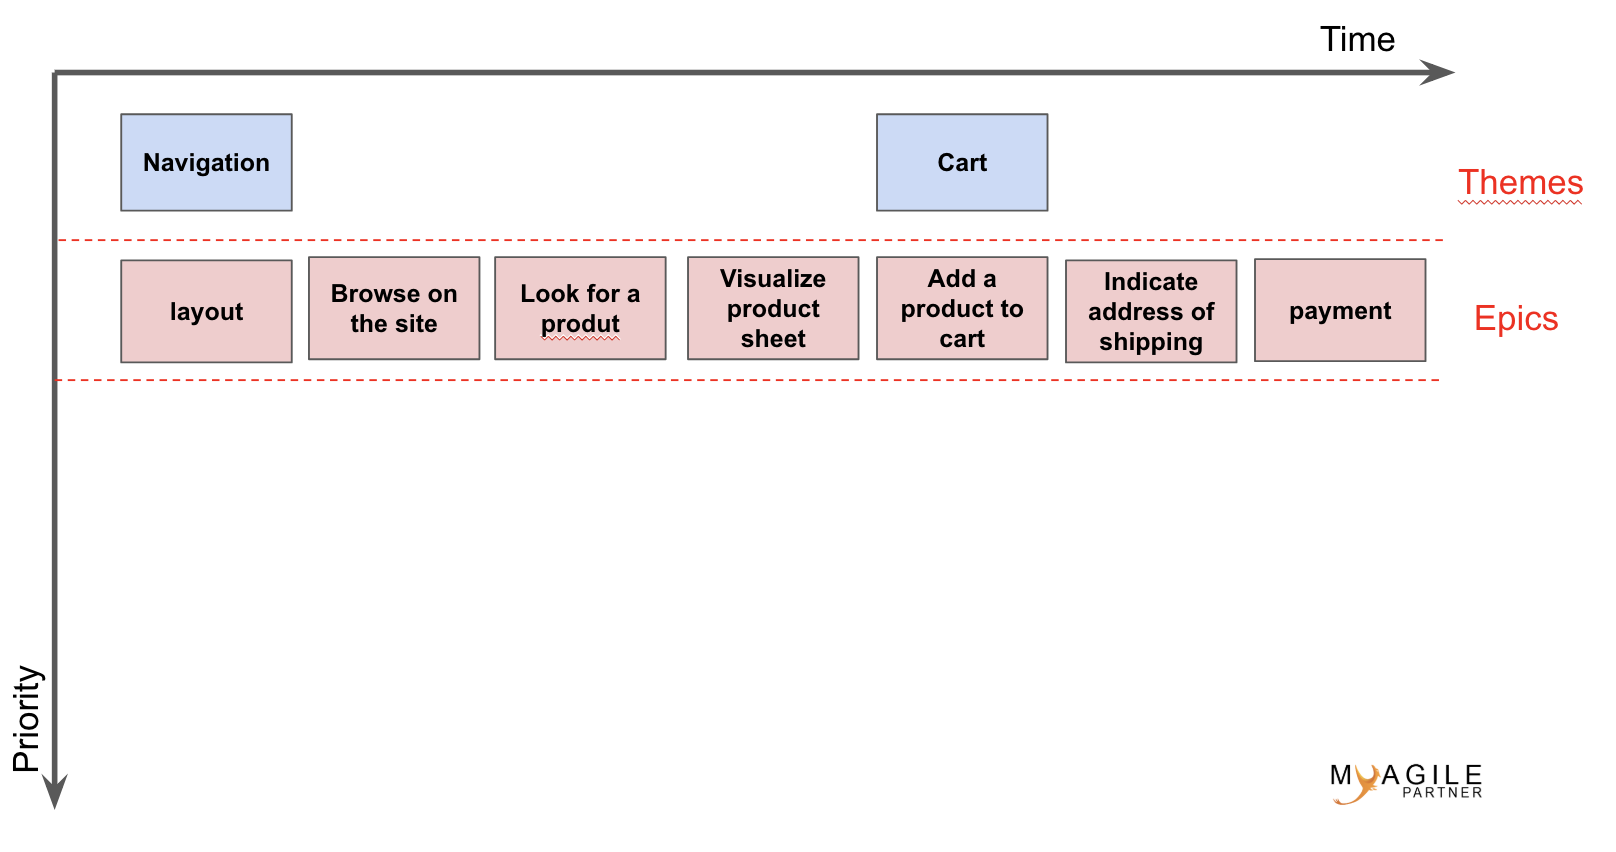
For reasons of legibility and space, I have put only my first two themes on the image but you have to do the exercise with all themes.
As for the themes, we try to put our epics from left to right in the sense that we think to treat them. We shift each theme to have them above the first epic of the theme.
Now, as you can see, our customer journey is almost totally in our story mapping.
Split in user-stories
We will see to split our Epics now in story if it’s necessary. If it is not possible, your Epic will become a story that will integrate to another Epic.
Here is the first result:

We have decided to put the homepage under the Epic “Navigue on the site” and we added an Epic which allows to create the general visual; It did not appear in the customer journey. We just made our refinement.
If your homepage becomes complex, it could become a new Epic. There is not a perfect rule in this splitting; the main thing is that the product owners who make this exercise feel as comfortable as possible.
Under the epic “Browse on the site”, there were too many stories. So we put the stories in two columns; that’s why there is no epic about the story “Terms” (which is integrate at the epic “Browse on the site”).
You will understand that I took the terms word for word from my customer journey but that you could rename “Navigue on the site” in “Navigation”.
A first vision of releases?
Story mapping can also provide a first view of our future releases. So we will use the priority axis to help us to do that.
I will show you now how I can define a first release V1 and V2. On this story mapping, there is not everything but you have to consider the result only as an understanding exercise.
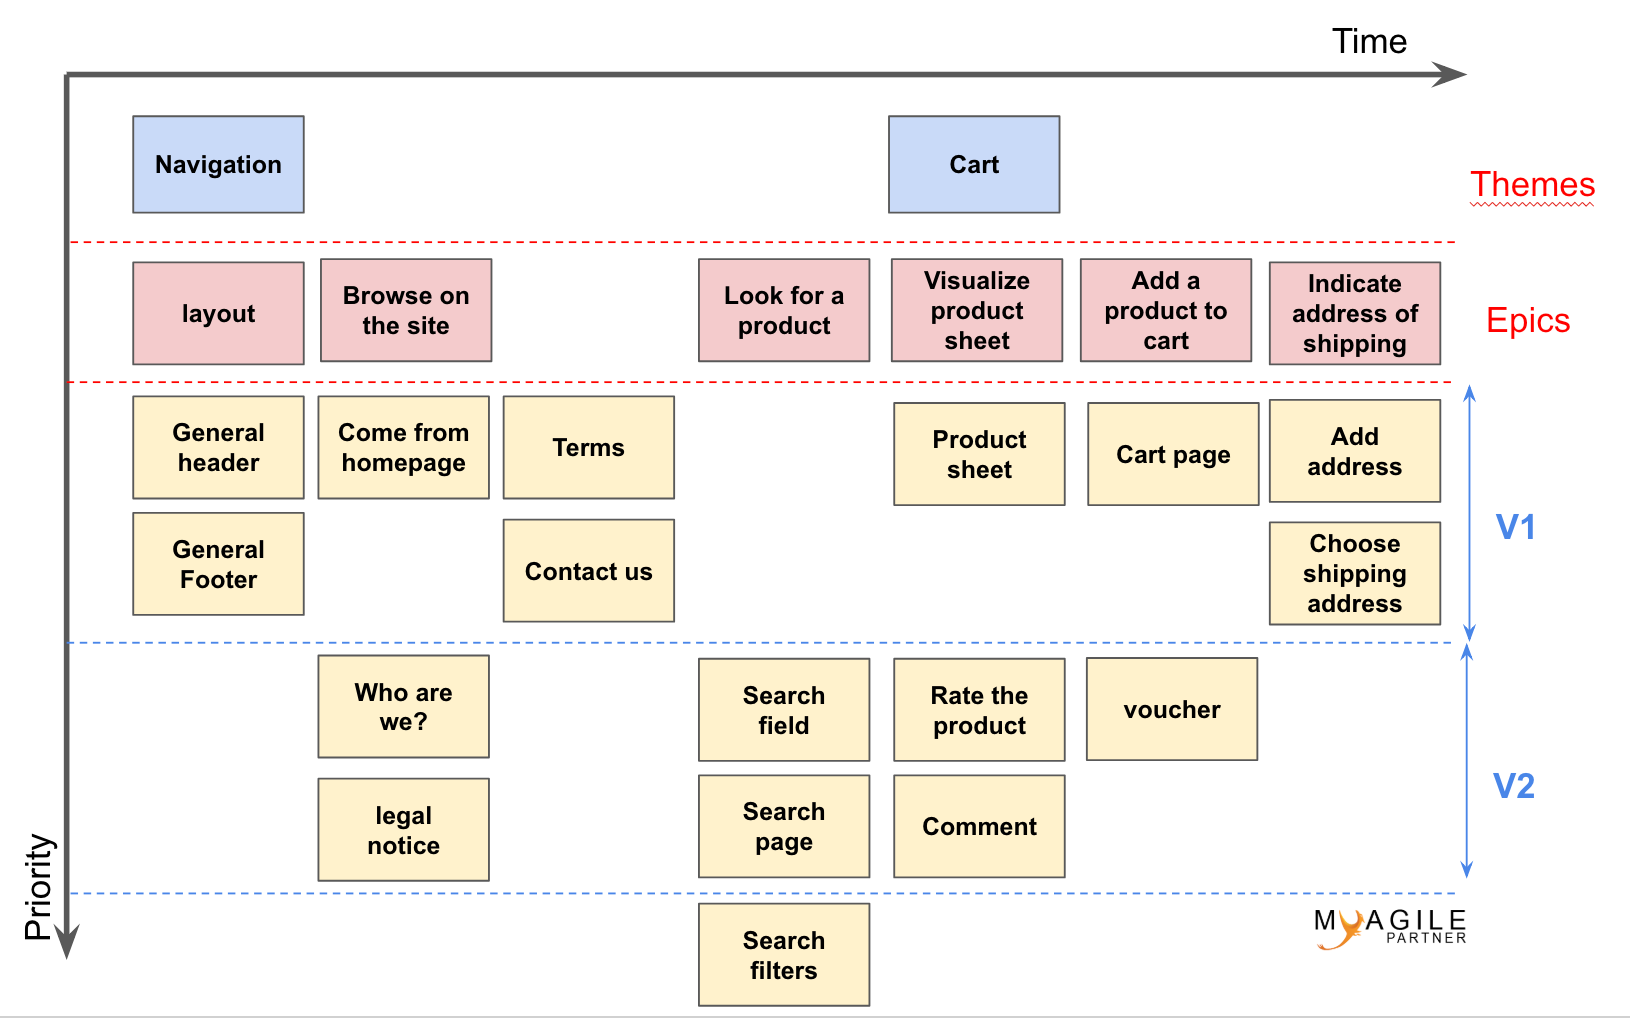
We shifted our stories so that they enter the releases that are defined by the areas V1 and V2. We will have a better visibility of the entire project. You will have also a good vision of the deployment strategy that you would like to implement.
Conclusion story mapping
To conclude, you have everything that you need to do your story mapping. Besides, Feel free to ask me if some points are not quite clear for you.
Useful link : agile framing to launch your project in 100% agile



9 Trackbacks / Pingbacks